

A slump test measures how far a cone of fresh concrete sags when the mould is lifted away. It takes a few minutes at the truck and tells you whether the load has the consistency that was ordered. In Australia the method is AS 1012.3.1, and AS 1379 sets how far the result may stray from the specified slump: an 80 mm mix, for example, must measure between 65 and 95 mm.
What the slump test does not do is measure strength. It is a check on water content and uniformity, done before the concrete goes into the forms, and it is the first thing a supervisor or tester does when a truck arrives. If you are still sizing the pour, the free concrete volume calculator works out cubic metres and wastage, and the pre-pour inspection checklist covers everything that should be signed off before the first truck turns up.
What the slump test tells you, and what it doesn’t
Slump is a measure of consistency: how wet or stiff the mix is. For a given mix design, more water means more slump, so a load that slumps much more than the last one has probably had water added or was batched wet. Watching how the cone settles, and tapping the side of it gently afterwards, also gives a feel for cohesion: a good mix slumps as one mass, while a harsh or segregating mix falls apart.
The limits matter just as much:
- It is not a strength test. Two loads with the same slump can have different water-cement ratios if one contains a water-reducing admixture.
- It is not a full workability test. The CCAA points out that concretes of the same slump can behave quite differently when placed, pumped or finished.
- It works in a band. EN 12350-2 describes the test as sensitive between about 10 mm and 210 mm of slump, and not suitable for coarse aggregate larger than 40 mm. Very stiff mixes barely move; flowing and self-compacting mixes collapse and need the slump flow test instead.
- It changes with time. Slump drops as the cement hydrates and the mix loses water, faster in hot weather. A result is only meaningful with the time it was taken.
Slump test equipment
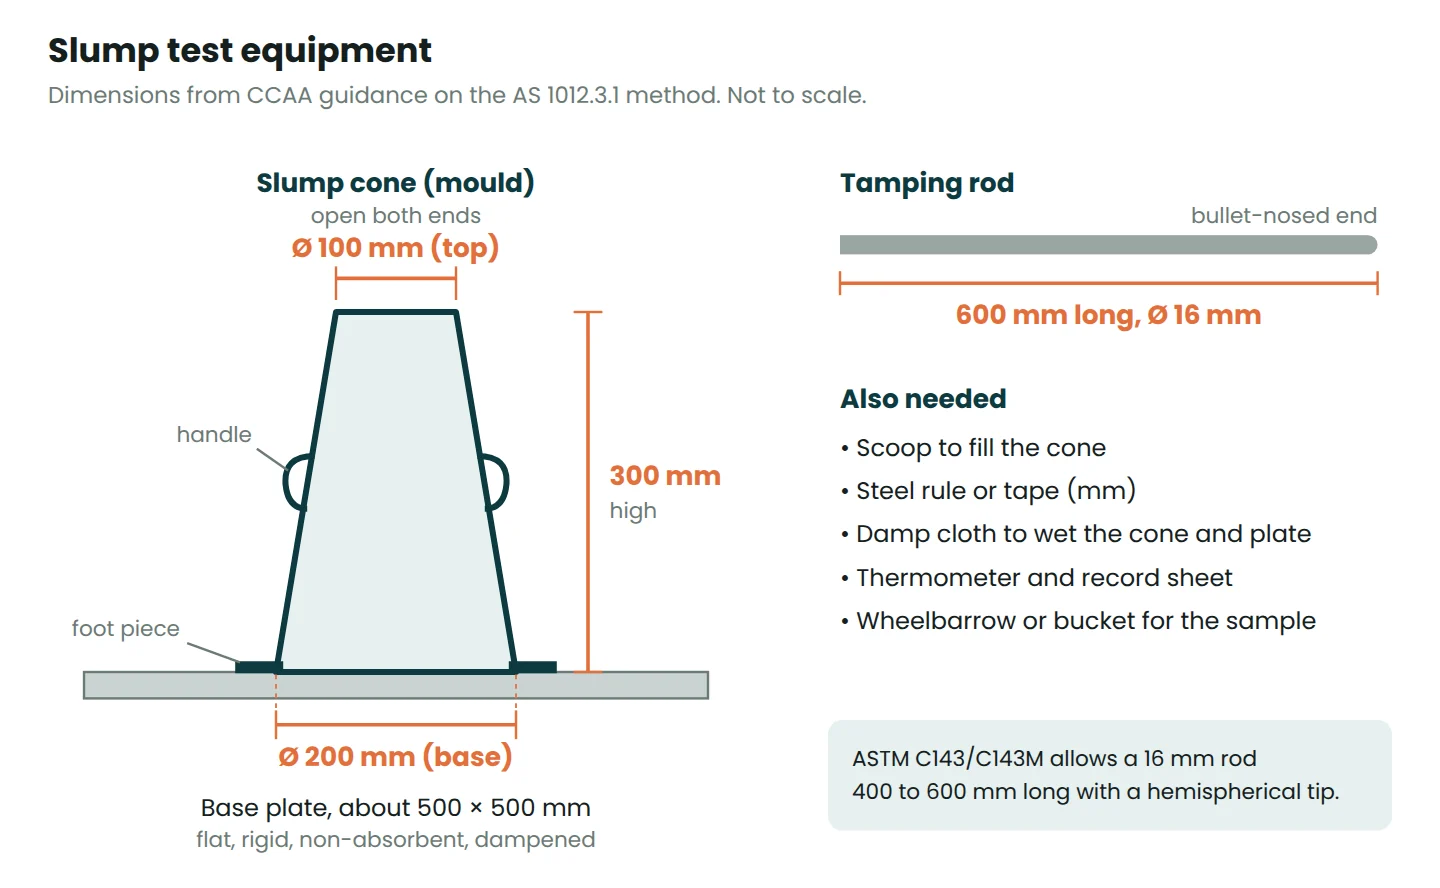
The kit is simple, and the dimensions are the same in the Australian, American and European methods:
- Slump cone (mould): a hollow metal frustum 300 mm high, 200 mm diameter at the base and 100 mm at the top, with foot pieces to stand on and two handles.
- Tamping rod: a straight steel rod 16 mm in diameter and 600 mm long with a bullet-nosed end, as described in CCAA guidance for the AS method. ASTM C143/C143M allows a 16 mm rod between 400 and 600 mm long with a hemispherical tip.
- Base plate: a flat, rigid, non-absorbent plate about 500 mm square, dampened before use.
- Small items: a scoop, a steel rule or tape reading in millimetres, a damp cloth, a thermometer and the record sheet.
How to do a slump test, step by step
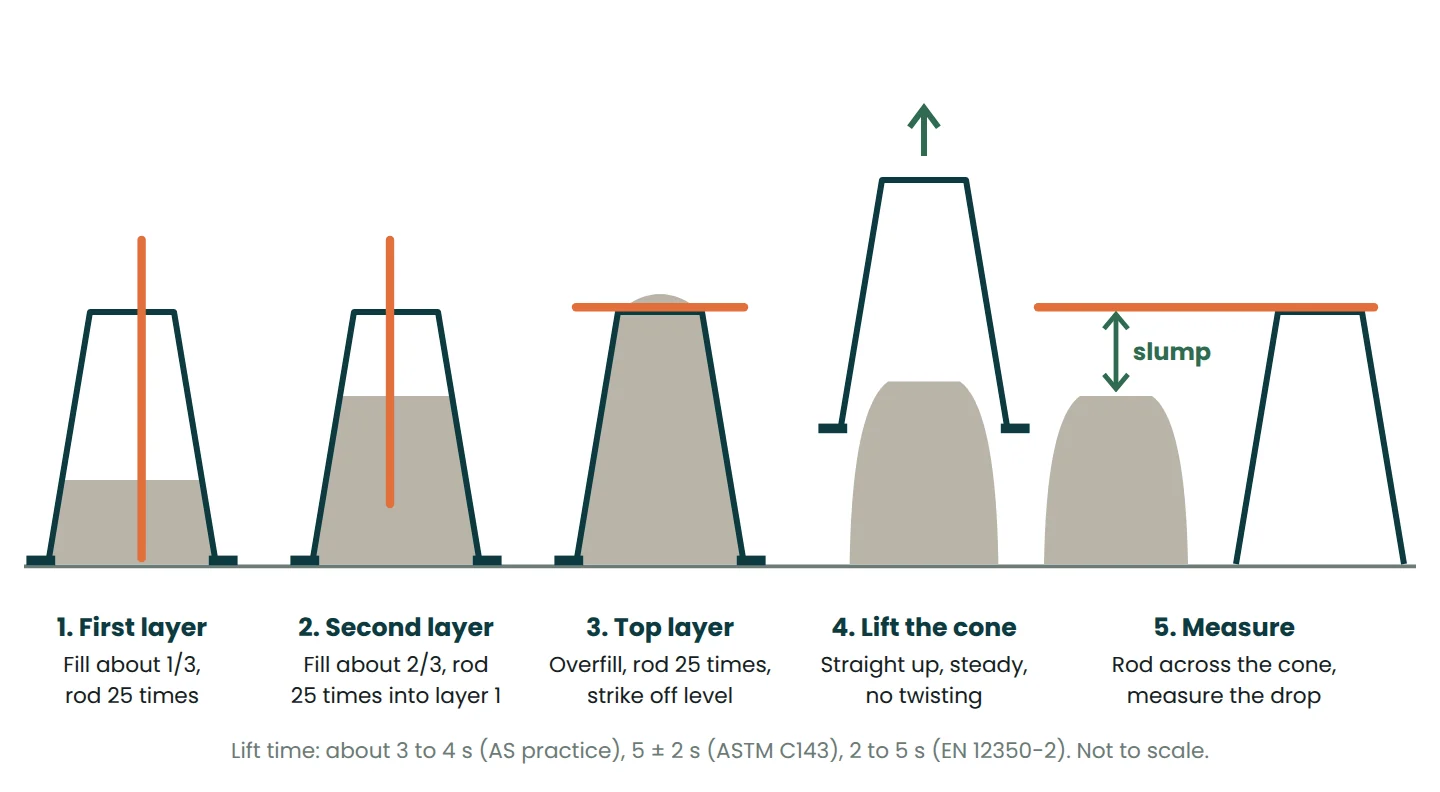
This is the sequence used on Australian sites under AS 1012.3.1, as described in CCAA guidance. The order of work is the same under the other standards; the differences are in the next section.
- Take the sample. For a slump test alone, take it from the truck after the first 0.2 m³ has been discharged, into a clean barrow or bucket. Test it straight away.
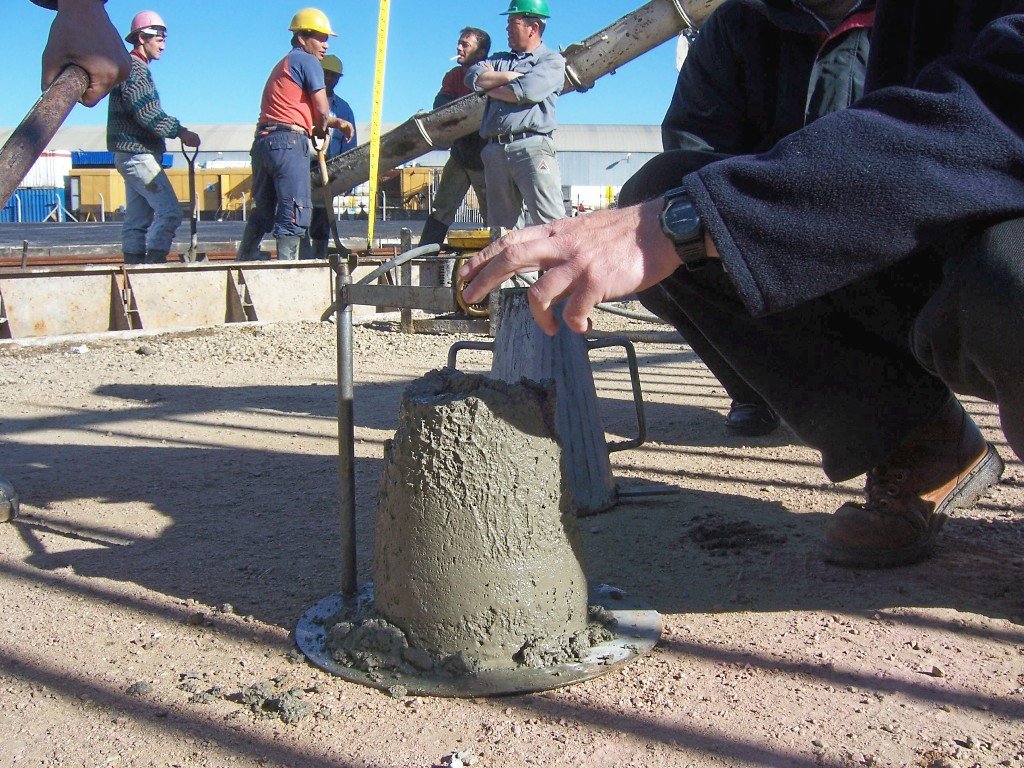
- Set up. Wipe the inside of the cone and the base plate with a damp cloth. Place the plate on firm, level ground out of the way of the chute, put the cone in the middle and stand on both foot pieces.
- First layer. Fill to about one-third of the cone’s volume. Rod it 25 times, spreading the strokes over the whole area and going through the full depth of the layer.
- Second layer. Fill to about two-thirds and rod 25 times, through this layer and just into the one below.
- Top layer. Overfill the cone and rod 25 times. If the level drops below the rim while rodding, add more concrete.
- Strike off. Roll the rod across the top to leave a level surface. Clear spilt concrete from around the base.
- Lift. Step off the foot pieces and raise the cone straight up, slowly and steadily, in about 3 to 4 seconds. Do not twist or tilt it.
- Measure. Stand the empty cone beside the concrete and lay the rod across its top so it reaches over the sample. Measure from the underside of the rod down to the top of the concrete at several points and report the average, in millimetres.
- Check the shape. Note whether it is a true, shear or collapse slump, then tap the side gently to judge cohesion.
- Record and decide. Write down the result with the docket details and compare it with the tolerance before the load is placed.
Slump test standards compared: AS 1012.3.1, ASTM C143 and EN 12350-2
The three methods use the same cone and three rodded layers, but they differ in timing and, most importantly, in where the slump is measured. A result taken one way is not always directly comparable with one taken another way, so record which method you used.
| Item | AS 1012.3.1 (Australia) | ASTM C143/C143M (USA) | EN 12350-2 (Europe, UK) |
|---|---|---|---|
| Layers and rodding | Three layers, each about one-third of the volume, 25 strokes each | Three layers, each about one-third of the volume, 25 strokes each, rod about 25 mm into the layer below | Three layers, 25 evenly spread strokes each |
| Lifting the cone | Straight up, slowly, about 3 to 4 s | 300 mm in 5 ± 2 s | 2 to 5 s |
| Timing | Sample after the first 0.2 m³; test without delay | Start within 5 min of sampling; fill to lift within 2½ min | Fill to lift within 150 s |
| Where slump is measured | Several readings to the top of the slumped concrete, averaged | To the displaced original centre of the top surface, nearest 5 mm | To the highest point of the slumped concrete |
| If it shears | Repeat on another part of the sample; if it shears or collapses again, record that instead of a slump | Discard and retest; two shears in a row mean the test is not suitable for the mix | Repeat; repeated shear means the mix lacks the cohesion for this test |
EN 12350-2 adds one more check: if the concrete keeps slumping for more than about a minute after the cone is lifted, the test is not a valid measure of its consistency. Always work from the current edition of the standard named in your specification.
True, shear and collapse slump
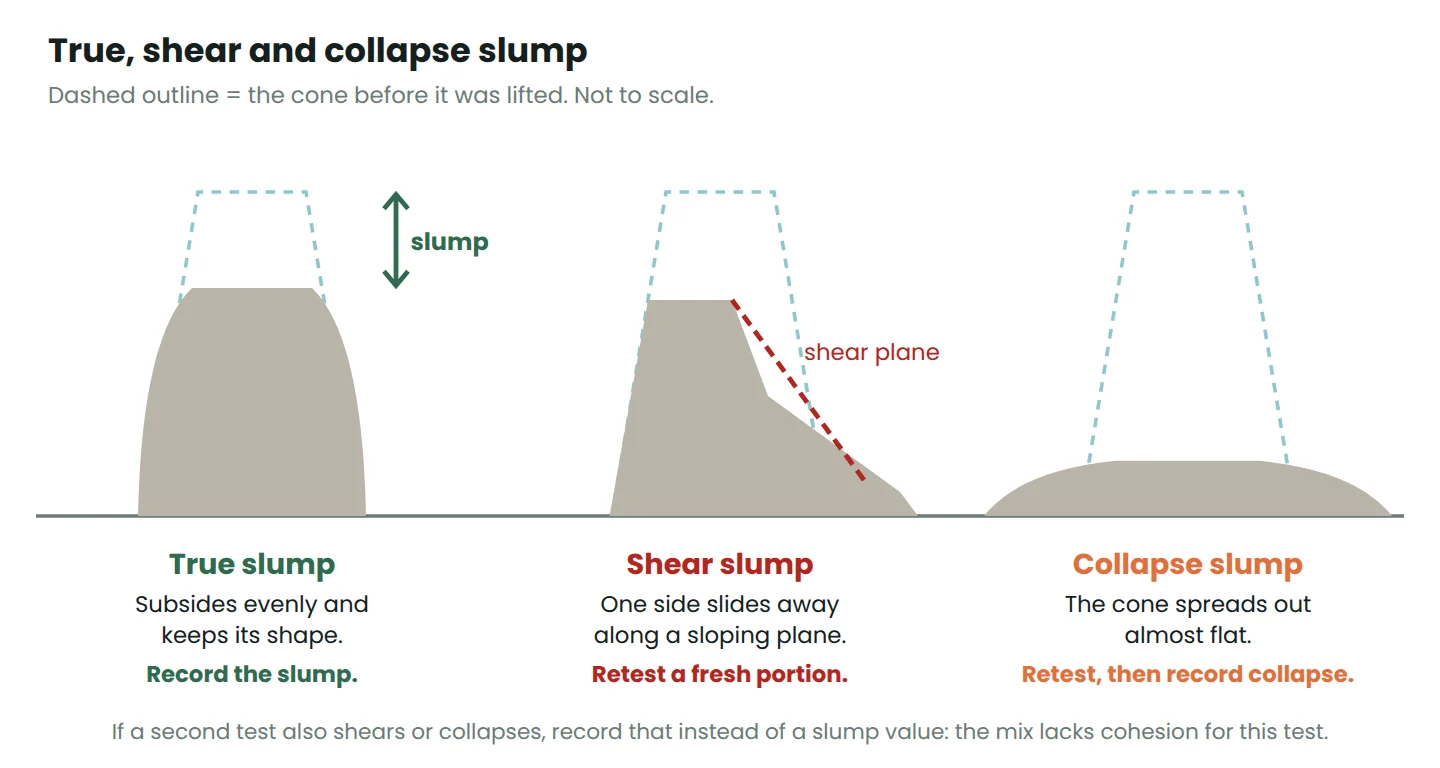
Only one of the three shapes gives a number you can use.
- True slump: the concrete subsides evenly and keeps roughly the shape of the cone. This is a valid result.
- Shear slump: one side slides off along a sloping plane. It usually points to a harsh mix short of fines, or poor technique such as a tilted lift. Retest a fresh portion; if it shears again, record shear.
- Collapse slump: the concrete spreads out almost flat. Either the mix is far too wet, or it is a flowing or self-compacting mix that should be tested for slump flow instead.
Slump tolerances in AS 1379
Under AS 1379, normal-class concrete is ordered with a specified slump of 20 to 120 mm in 10 mm steps, measured at the point of delivery. Any other value makes the concrete special class. The measured slump must fall within these tolerances:
| Specified slump (mm) | Tolerance (mm) | Example: acceptable range |
|---|---|---|
| Less than 60 | ±10 | 40 specified: 30 to 50 |
| 60 to 80 | ±15 | 80 specified: 65 to 95 |
| Over 80, up to 110 | ±20 | 100 specified: 80 to 120 |
| Over 110, up to 150 | ±30 | 120 specified: 90 to 150 |
| Over 150 | ±40 | 180 specified: 140 to 220 |
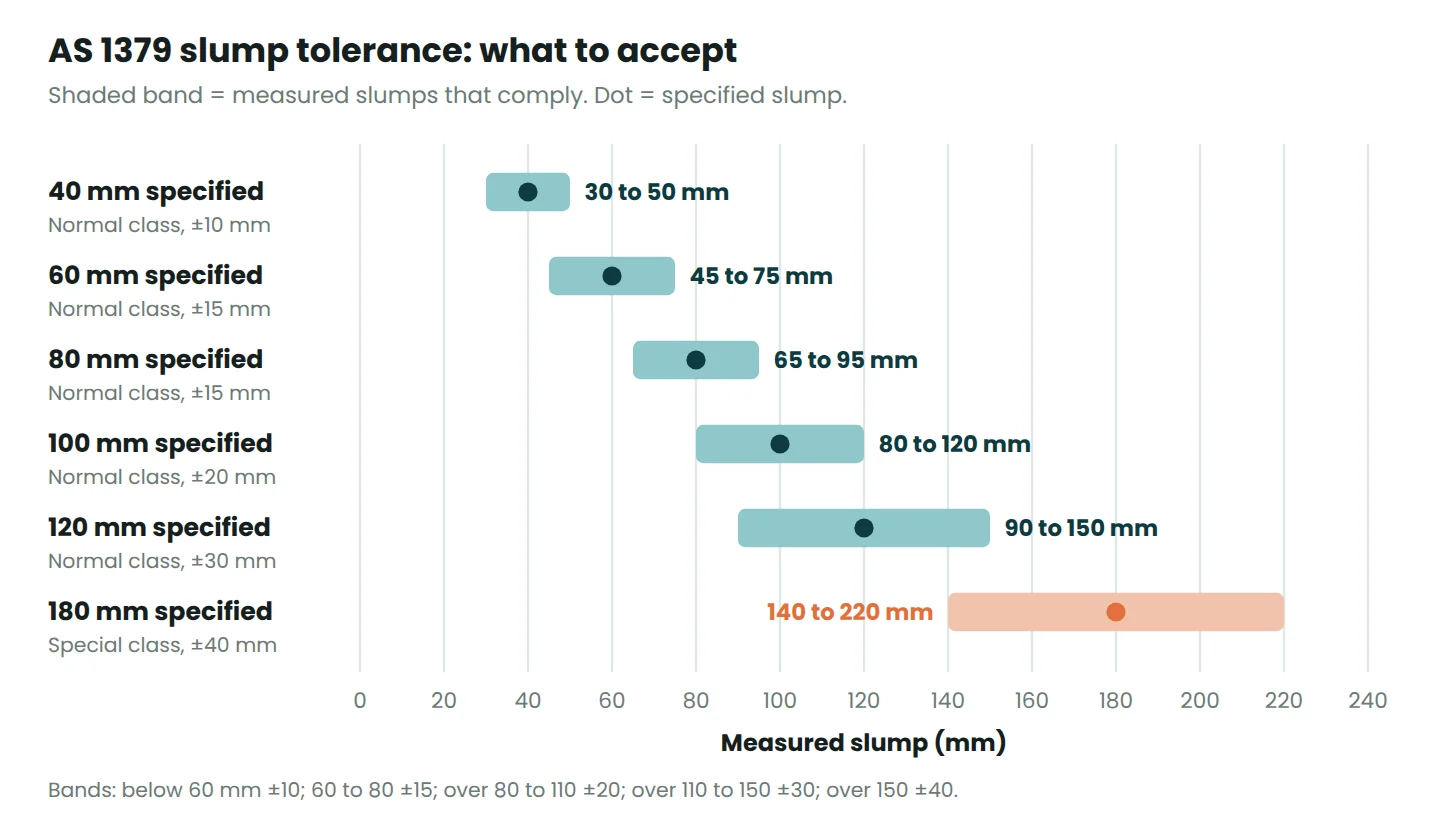
Notice that the bands widen as slump rises. A 10 mm miss on a 40 mm mix is already at the limit; the same miss on a 120 mm mix is well inside it. Know the band for your mix before the first truck arrives, so the decision at the chute takes seconds.
What to do when a load is out of tolerance
- Retest at once on a fresh sample from the same truck. Technique errors are common, and CCAA guidance is to reject the rest of the load only if the second test also fails.
- Too stiff: the supplier may bring it into tolerance with an admixture, or with water within limits they have approved. Retest after the truck has remixed.
- Too wet: there is no fix on site. Reject the load, or hold it while the engineer decides.
- Check the clock. AS 1379 allows 90 minutes from the start of mixing to complete discharge unless a longer time has been agreed. An old load may be stiff for good reason.
- Write it down: docket number, times, both results and what was done.
Adding water on site, and why it is a problem
Adding water is the quickest way to raise slump, and the quickest way to lose strength. Strength and durability depend on the water-cement ratio, and every extra litre raises it. The CCAA Guide to Concrete Construction advises that only very minor workability adjustments should be made with water alone, and that larger ones need cement as well to hold the ratio. Extra water also increases bleeding, segregation and drying shrinkage.
AS 1379 allows water to be added on site only within limits the supplier has approved, provided it does not push the mix past any specified maximum water-cement ratio. The amount must be recorded on the delivery docket, and the load must be mixed thoroughly afterwards.
Worked illustration: 100 litres into a 7 m³ truck
Take an illustrative mix with 340 kg of cement and 170 L of water per cubic metre. The driver adds 100 L to a 7 m³ load to loosen it up.
- Original water-cement ratio:
170 ÷ 340 = 0.50. - Extra water per cubic metre:
100 ÷ 7 = 14.3 L/m³, so the water is now 184.3 L/m³. - New ratio:
184.3 ÷ 340 = 0.54. - Effect on strength: Abrams’ law relates 28-day strength to the ratio as
S = A ÷ Bw/c. With the commonly quoted constants A = 96 MPa and B = 7, the strength ratio is7−(0.542 − 0.500) ≈ 0.92, about 8% lower. A mix that would have reached 32 MPa ends up nearer 29.5 MPa. - To keep the ratio at 0.50, the load would need
14.3 ÷ 0.50 = 28.6 kg/m³more cement, or 200 kg across the truck.
Real mixes vary, but the direction never does. To see how much water and cement a mix carries in the first place, try the cement-sand-aggregate calculator, which also gives the water for a chosen water-cement ratio.
Related tests on fresh concrete
- Slump flow: for self-compacting concrete the cone is filled without rodding, lifted, and the spread of the concrete is measured instead of its drop (AS 1012.3.5, ASTM C1611/C1611M, EN 12350-8). The CCAA gives a typical spread of about 600 mm and a T500 time of 2 to 10 seconds.
- Cylinders and cubes: strength is checked on specimens made from the same delivery. AS 1012.8.1 covers making 100 × 200 mm or 150 × 300 mm cylinders, and AS 1012.9 covers testing them. The smaller size is only used where the aggregate is 20 mm or smaller and the designer agrees. Under AS 1379 project assessment, test at least once per 50 m³ of each grade. Cubes are used instead of cylinders in some countries.
- Temperature: AS 1379 gives limits of 5 °C to 35 °C for concrete as supplied. Hot concrete loses slump quickly.
- Air content: measured by the pressure or volumetric methods in AS 1012.4.1 to AS 1012.4.3. Normal-class concrete must contain less than 5.0% air, and where air is specified the result must be within ±1.5% of the specified value.
Sampling and recording a slump test
Sampling follows AS 1012.1. For a slump test on its own, a single sample taken after the first 0.2 m³ is normal. For cylinders, or when sampling from somewhere other than an agitator truck, take a composite sample: three or more roughly equal portions spread through the discharge, avoiding the first and last 0.2 m³. On site I record, for every load tested:
- Date, docket number, truck number, batch time and time of test.
- Element or pour location, and the volume placed so far.
- Specified slump, measured slump and slump type.
- Concrete temperature and the weather.
- Any water or admixture added, as written on the docket.
- Cylinder identification numbers and the name of the tester.
Common slump test mistakes
- Sampling the first concrete out of the chute. It is often wetter or drier than the rest. Wait for the first 0.2 m³.
- Testing on soft or sloping ground, or with a dry cone. The plate rocks, the cone absorbs water and the result drifts.
- Stepping off the foot pieces while filling. Grout leaks out of the bottom and the cone lifts early.
- Wrong rodding. Fewer than 25 strokes, all in the middle, or stabbing hard into the plate.
- A fast, twisted or tilted lift. This alone can turn a true slump into a shear.
- One reading to the wrong point. Use the point your standard names, and take several readings where the method calls for an average.
- Letting the sample sit. Slump falls while the barrow waits, faster in sun and wind. Test straight away.
- Fixing a low result with an unrecorded hose. It hides the problem and weakens the concrete.
- Treating a good slump as proof of strength. Only the cylinders tell you that.
Before the next pour, check quantities again with the concrete volume calculator, or work through the method in how to calculate concrete volume.
Frequently asked questions
What is a good slump for concrete?
The right slump is the one in your specification, chosen for the element, placing method and finish. Normal-class concrete in Australia is specified between 20 and 120 mm; anything outside that is special class.
How long does a slump test take?
About two to three minutes once the sample is taken. ASTM C143/C143M requires filling to lifting within 2½ minutes, and EN 12350-2 within 150 seconds.
Can you add water to concrete if the slump is low?
Only within limits the supplier has approved under AS 1379, without exceeding any specified water-cement ratio, and with the amount recorded on the docket. An admixture is usually the better fix.
Does slump affect concrete strength?
Slump itself does not, but the water used to get it does. Raising slump with water raises the water-cement ratio and lowers strength; raising it with an admixture need not.
References
- Standards Australia. AS 1012.3.1, Methods of testing concrete: Determination of properties related to the consistency of concrete, Slump test.
- Standards Australia. AS 1379, Specification and supply of concrete.
- ASTM International. ASTM C143/C143M, Standard Test Method for Slump of Hydraulic-Cement Concrete.
- CEN. EN 12350-2, Testing fresh concrete, Part 2: Slump test.
- Cement Concrete & Aggregates Australia. Guide to Concrete Construction, Section 26: Concrete Testing and Quality Assurance.
- Cement Concrete & Aggregates Australia. Concrete Basics: A Guide to Concrete Practice.
- Washington State DOT Materials Manual. Field procedure for AASHTO T 119 (ASTM C143) slump of concrete.
- Abrams, D. A. (1918). Design of Concrete Mixtures. Bulletin 1, Structural Materials Research Laboratory, Lewis Institute, Chicago.
This article is general information for learning and planning. Always follow your project specification, the current standard and the advice of the responsible engineer.



Leave a Reply