
Concrete is the one material on site you can’t take back. Once it’s in the forms, a missing starter bar, a sagging top mat or 15 mm of lost cover turns into a coring job, a chemical-anchor retrofit or a break-out, plus the uncomfortable conversation that comes with it. The pre-pour inspection is the last cheap moment to catch those mistakes.
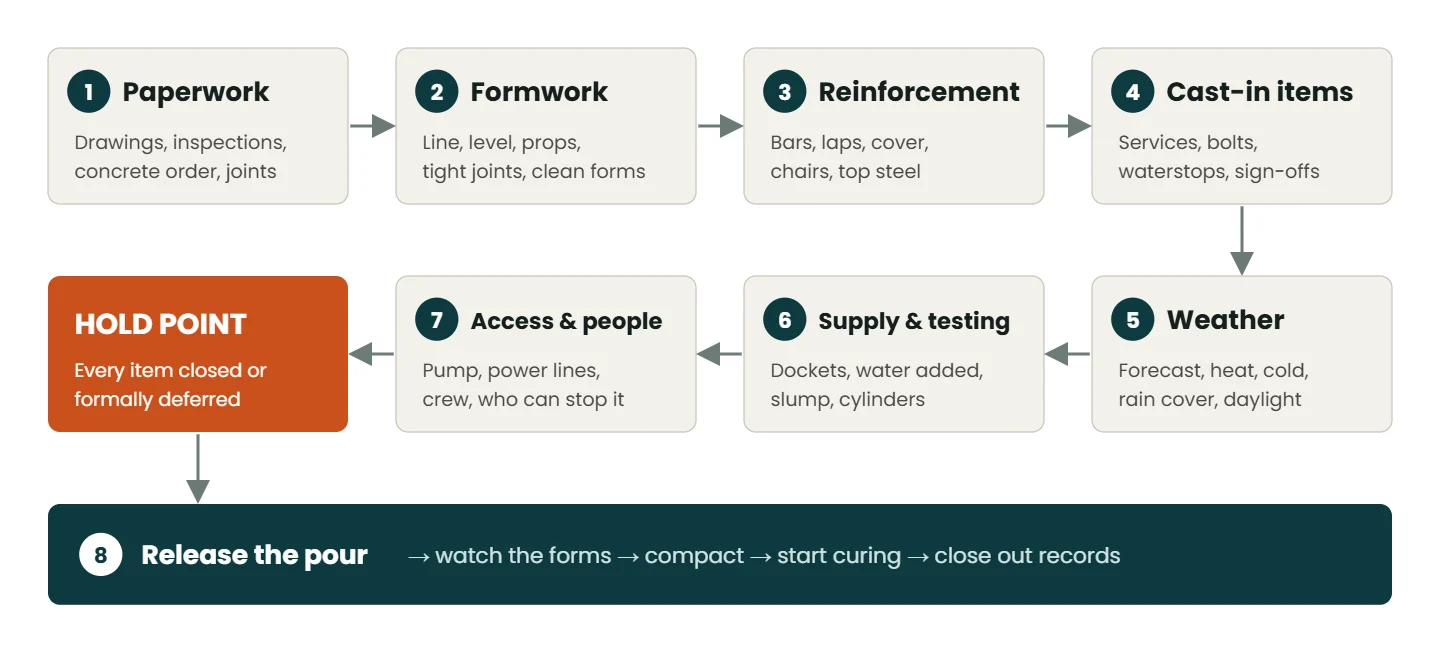
This is the checklist I walk before releasing a pour. It follows the order the concrete will meet things: paperwork, formwork, reinforcement, cast-in items, weather, supply and people. It’s written with Australian Standards in mind, but the logic applies on any site.
How to use this checklist
Treat the pre-pour inspection as a hold point. The pour isn’t released until every item is either closed out or formally deferred by someone with the authority to defer it. If your project runs an Inspection and Test Plan (ITP), this is where that hold point gets signed.
Walk it physically. Most of these checks can’t be done from the site office, and the ones that can (drawings, orders, bookings) should be done the day before, so the morning of the pour is only for looking.
1. Paperwork (the day before)
- Current drawings on site. Check the revision in the drawing register against what the steel fixers and formworkers are actually using. Superseded drawings in the site shed are one of the most common sources of reinforcement errors.
- Inspections booked and recorded. If the design engineer or certifier has to inspect before the pour, confirm the inspection is booked, done and written down. A verbal “looks fine” is not a record.
- Concrete order matches the specification. Strength grade (for example N32), slump, maximum aggregate size, any special-class requirements and admixtures. Check the volume, with a sensible allowance for waste and form deflection.
- Construction joints agreed. Where the pour stops is a design decision. If the joint location isn’t on the drawings, get it approved in writing before the pour, not during it.
- Pump, tester and finishing crew booked for the same start time, with a backup plan if one of them doesn’t show.
2. Formwork and falsework
- Line, level and dimensions checked against the set-out. Measure slab thickness at several points, especially at set-downs, steps and edge beams, where errors hide.
- Props and back-propping installed to the formwork design and bearing on something solid. Props on soft or freshly backfilled ground settle as the load comes on.
- Formwork certified where the project or AS 3610 requires it.
- Joints tight. Gaps leak grout, and grout loss leaves honeycombing at the face.
- Release agent on the forms, not on the reinforcement. Oil on bars reduces bond.
- Clean. Sawdust, tie-wire offcuts, cigarette butts and standing water all end up in the concrete. Blow out the forms and use the clean-out openings at the base of walls and columns.
- Penetrations and set-downs boxed out in the right places and fixed so they won’t float or shift.
3. Reinforcement (where most defects live)
- Bar size, number and spacing against the drawings and bar schedule. Count the bars in a bay rather than judging spacing by eye.
- Lap lengths and locations as shown on the drawings. Laps bunched at one section, or placed where the designer didn’t intend, are easy to miss from above.
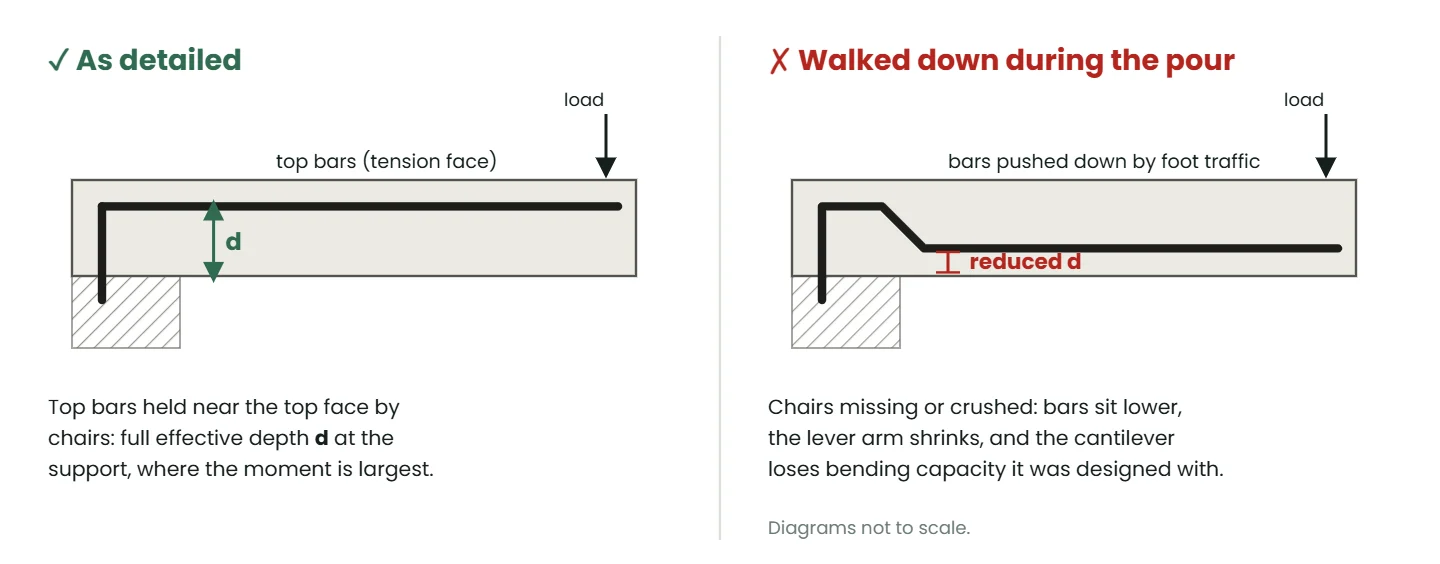
- Top steel supported. Top mats and cantilever top bars need proper chairs or trench mesh. In a cantilever, the top reinforcement is doing the critical work. If it gets walked down during the pour, the cantilever loses much of its capacity.
- Starters, cogs and hooks present and positioned for the next pour.
- Tied securely, so nothing shifts under foot traffic, vibration or the pump hose.
- Condition. Light surface rust is normal. Loose scale, mud, oil and release agent are not.
- Right material. Check the delivery dockets or bar tags show the specified grade. In Australia, reinforcing steel is supplied to AS/NZS 4671.
Cover is measured to the outermost bar
Cover is the most checked item on a pre-pour inspection, and one of the most often measured wrong. AS 3600 defines cover as the distance from the outside of the reinforcing steel to the nearest permanent surface of the concrete. In a beam or column, the outermost steel is usually the ligature (fitment), not the main bar.
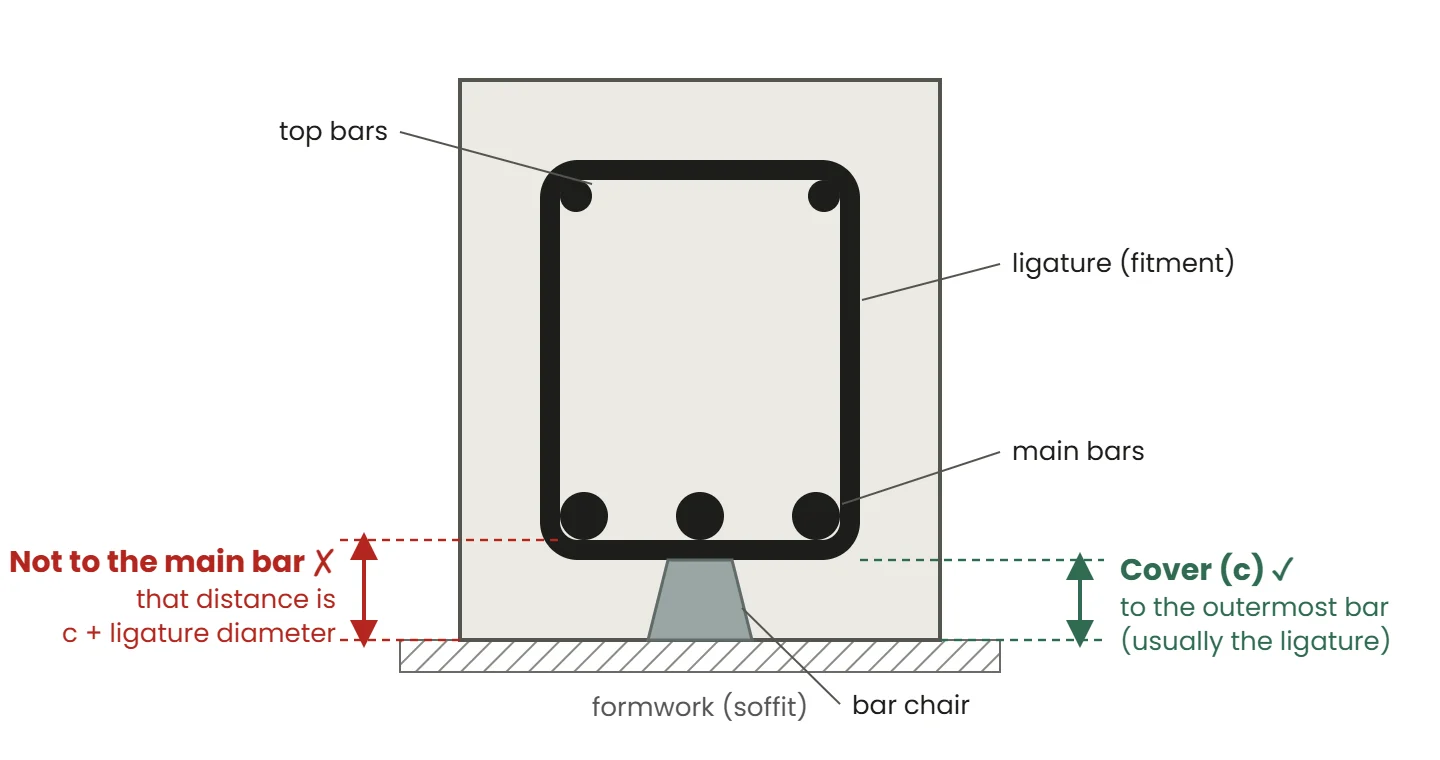
The trap: bar chairs get chosen to suit the main bars, and the ligatures end up one bar diameter (often 10–12 mm) closer to the face than intended. On a member designed for 40 mm cover, that’s a real loss of durability, and it’s invisible once the concrete is in.
- Confirm the specified cover on the drawings. It depends on the exposure classification and fire rating, so it can differ between members in the same pour.
- Measure with a tape from the form face to the outermost bar, at several points in every bay.
- Check the bar chairs: right height, right type (plastic or plastic-tipped where the surface will be exposed, to avoid rust spots), and close enough together that the mat doesn’t sag between them. Bar chairs in Australia are covered by AS/NZS 2425.
- Re-check after other trades have walked over the mesh. Cover that was right at 7 am can be gone by 9 am.
4. Cast-in items and services
- Every trade’s items are in: conduits, sleeves, plumbing penetrations, cast-in plates, ferrules and holding-down bolts. Ask each trade to confirm, and record it. “I thought the sparky was coming back” is not a sign-off.
- Positions and levels checked against the drawings. Holding-down bolts should be set in a template and surveyed. A bolt group that’s 20 mm out becomes a steelwork problem later.
- Services not compromising the structure. Conduits bunched together in a thin slab, or pushing reinforcement out of position, reduce both cover and section. Flag them before the pour, not after.
- Waterstops at construction joints are continuous, joined correctly and held in position.
5. Weather and timing
- Check the forecast the evening before and the morning of the pour: rain, wind and temperature.
- Hot, dry or windy days. Cement Concrete & Aggregates Australia (CCAA) guidance is that once the evaporation rate exceeds about 1 kg of water per square metre per hour, you need precautions against plastic shrinkage cracking: windbreaks, an evaporation retarder, an earlier start, and curing ready to go the moment finishing ends.
- Concrete temperature. AS 1379 requires concrete to be between 5 °C and 35 °C at the point of delivery. On cold mornings, plan protection for the fresh concrete as well.
- Rain covers on site before the first truck, not after the first shower.
- Enough daylight to finish, or lighting organised if the pour will run late.
6. Concrete supply and testing
- Read every delivery docket before discharge: mix and grade, slump, batch time and volume. A wrong mix is far easier to send back than to test, argue about and core later.
- Record which truck went where. Docket numbers matched to pour locations make any later investigation much easier.
- Control water additions. Add only what the specification and supplier allow, and record it on the docket. Extra water raises slump and lowers strength.
- Have testing ready. Slump tests (AS 1012.3.1) and test cylinders (AS 1012.8.1) at the frequency the specification requires, with the tester booked and a safe, level spot to store the cylinders.
- Watch the pour rate on walls and columns. Placing concrete faster than the formwork was designed for increases the pressure on the forms.
7. Access, plant and people
- Pump position planned: outriggers on firm ground, clear of excavations, and outside the approach distances to overhead power lines set by your electrical safety regulator. Agree a washout area.
- Crew and equipment: enough people to place, vibrate and finish at the planned rate, plus a spare vibrator.
- Exclusion zones under the pump boom and around the placing area.
- One person with the authority to stop the pour, and everyone on site knows who it is.
8. During and after the pour
- Watch the formwork. Someone should be checking props and form faces for movement throughout the pour.
- Compact systematically so every area is vibrated, without holding the vibrator in one spot or using it to push concrete sideways.
- Start curing as soon as finishing allows. AS 3600 sets minimum continuous curing periods: at least 3 days for exposure classifications A1 and A2, and 7 days for B1, B2, C1 and C2. The specification may ask for more.
- Photograph the reinforcement before the pour, bay by bay, with a tape showing the cover. Those photos are the best evidence you’ll have if questions come up years later.
- Close out the records: dockets, test samples, weather, and any deviations along with who approved them.
Printable pre-pour checklist
A condensed version to print, or to copy into your own ITP. Adapt it to your project’s specification.
| Stage | Check | ✓ / initials |
|---|---|---|
| Paperwork | Current drawing revisions on site; required inspections done and recorded | |
| Paperwork | Concrete order matches spec: grade, slump, aggregate size, admixtures, volume | |
| Paperwork | Construction joints approved; pump, tester and crew booked | |
| Formwork | Line, level, dimensions and slab thickness checked | |
| Formwork | Props and back-props to design, on firm bearing; certified where required | |
| Formwork | Joints tight; release agent on forms only; forms clean and free of water | |
| Reinforcement | Bar size, number, spacing and laps match drawings | |
| Reinforcement | Cover correct to the outermost bar; chairs right height, type and spacing | |
| Reinforcement | Top steel supported; starters in place; bars tied and clean | |
| Cast-in items | All trades’ items in, positioned and signed off; holding-down bolts surveyed | |
| Cast-in items | Waterstops continuous and secured | |
| Weather | Forecast checked; hot, cold and rain measures ready | |
| Supply | Dockets checked before discharge; truck locations recorded | |
| Testing | Slump and cylinder sampling ready at the specified frequency | |
| Access | Pump position, power-line clearances, exclusion zones, washout area | |
| People | Crew and spare vibrator on site; one person authorised to stop the pour | |
| After the pour | Curing started; pre-pour photos and records filed |
Pre-pour inspection FAQs
What is a pre-pour inspection?
A pre-pour inspection is the final check of formwork, reinforcement, cast-in items and site readiness before concrete is placed. On most projects it is a hold point in the Inspection and Test Plan, so the pour cannot start until it is signed off.
Who signs off a pre-pour inspection?
Usually the builder’s site engineer or supervisor, and on many projects the design engineer or certifier as well, particularly for structural elements. The specification or the ITP names who has to sign.
How is concrete cover measured?
From the concrete surface to the outside of the nearest reinforcing bar. In beams and columns that is usually the ligature, which is how AS 3600 defines cover. Bar chairs need to suit the ligatures, not the main bars.
How long should concrete be cured in Australia?
AS 3600 requires at least 3 days of continuous curing for exposure classifications A1 and A2, and at least 7 days for B1, B2, C1 and C2. Project specifications often ask for longer.
References
- AS 3600:2018 Concrete structures
- AS 3610 Formwork for concrete
- AS 1379 Specification and supply of concrete
- AS 1012.3.1 Methods of testing concrete: slump test
- AS 1012.8.1 Methods of testing concrete: making and curing compression and indirect tensile test specimens
- AS/NZS 4671 Steel for the reinforcement of concrete
- AS/NZS 2425 Bar chairs in reinforced concrete
- Cement Concrete & Aggregates Australia (CCAA), guidance on hot- and cold-weather concreting
This checklist is general guidance. The project drawings, the specification and the design engineer’s instructions always take precedence.
Written and checked by a civil engineer for EducateLink.


Leave a Reply