
The rise and fall method works out the reduced level (RL) of each point by comparing every staff reading with the reading just before it from the same set-up. If the new reading is smaller, the ground has risen by the difference. If it is bigger, the ground has fallen. Start from a benchmark of known RL, add each rise, subtract each fall, and you have the level of every point on the run.
Its real advantage is the check: ΣBS − ΣFS = ΣRise − ΣFall = Last RL − First RL tests the arithmetic for every reading, intermediate sights included. Below is a full eleven-reading run with two change points, the same data by height of collimation, a loop misclosure check and the field mistakes behind most bad levels.
You can check your own booking with the free levelling calculator. It uses the same layout and the same checks shown below.
What a reduced level is
A reduced level is the height of a point above a chosen datum. In Australia, site RLs are usually tied to the Australian Height Datum (AHD) through a survey mark or a benchmark the surveyor has placed. On a small job you can adopt an arbitrary datum, such as 100.000 m on a nail in the kerb, as long as everyone on the project uses the same one.
A level does not measure RLs directly. It gives a horizontal line of sight, and each staff reading is the vertical distance from that line down to the point. Two readings from one set-up give a height difference. Chain those differences from a known RL and you can reduce every level on the run.
Backsight, intermediate sight, foresight and change points
Every reading in a level book is one of three types, and the type depends only on when you take it, not on where the point is. Two kinds of point matter as well: change points and benchmarks.
| Term | What it is | In the example below |
|---|---|---|
| Backsight (BS) | First reading after setting up, on a point of known RL | 1.425 on BM1, 0.965 on CP1, 2.880 on CP2 |
| Intermediate sight (IS) | Any reading between the BS and FS of one set-up | Points A, B, C, D and E |
| Foresight (FS) | Last reading before the level is moved or the run ends | 2.740 on CP1, 1.210 on CP2, 1.315 on BM1 |
| Change point (CP) | A firm point read as an FS, then as a BS after the level moves | CP1 and CP2 |
| Benchmark (BM) | A stable mark of known RL that starts and ideally closes the run | BM1, RL 42.350 m |
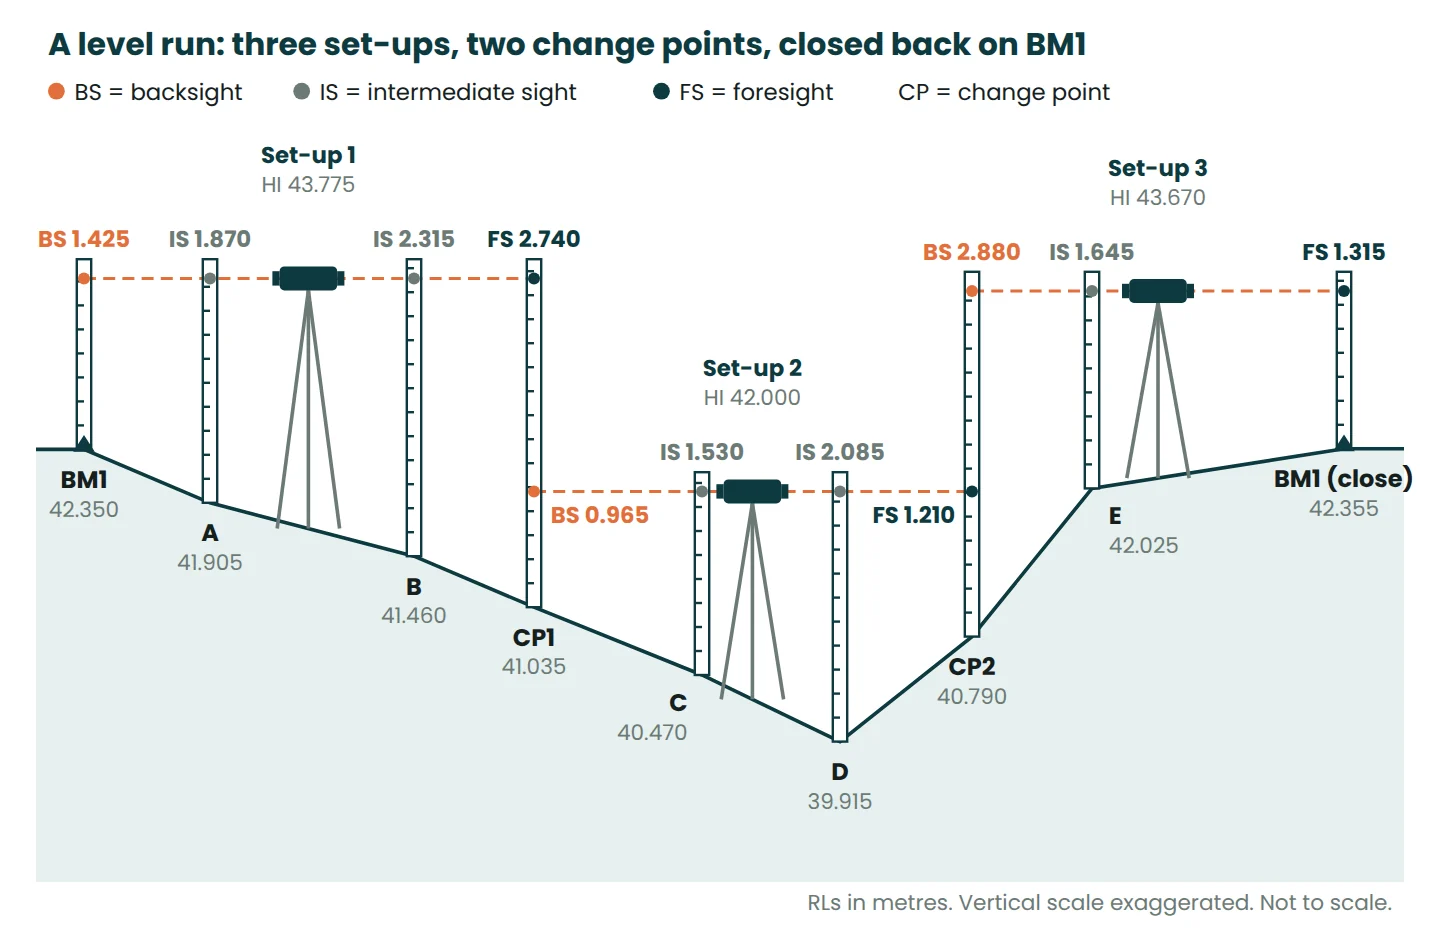
The change point is the weak link. It must not move between the foresight and the backsight, because any settlement goes straight into every RL that follows. Use a hard, well-defined point such as a kerb top, a bolt or a steel change plate stamped into firm ground, never loose gravel or grass.
How the rise and fall method works, step by step
- Book the backsight on the benchmark and write the benchmark RL on the same line.
- For each new reading from the same set-up, work out
previous reading − current reading. A positive answer is a rise, a negative answer is a fall. Book it in the right column without the sign. - Work out the RL:
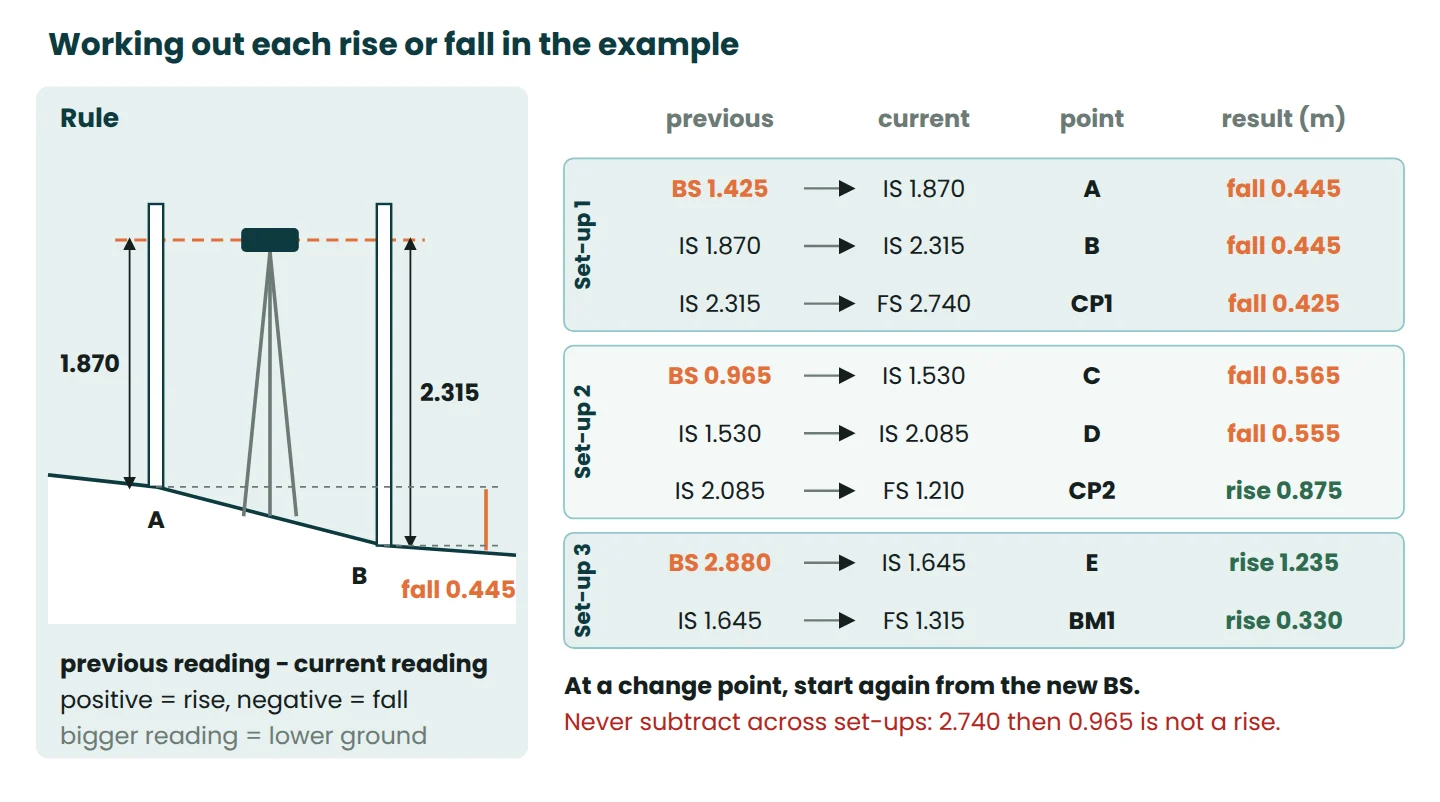
RL = previous RL + riseorRL = previous RL − fall. - At a change point, book the foresight and the new backsight on the same line. The foresight gives the rise or fall to the change point. The backsight then becomes the “previous reading” for the next point.
- Carry on to the last point, which should be a benchmark: either the one you started on or a second one of known RL.
- Add up the BS, FS, rise and fall columns and do the three-way arithmetic check before you leave site.
- Compare the closing RL with the known RL, check the misclosure against the allowable value, then distribute it.
Worked example: booking a rise and fall levelling run
The job: levels on five ground points around a small building platform. The run starts on BM1 (RL 42.350 m), uses three set-ups and two change points, and closes back on BM1. The total length of the loop is 360 m. There are eleven readings: three backsights, five intermediate sights and three foresights. All readings and RLs are in metres.
| Point | BS | IS | FS | Rise | Fall | RL (m) | Remarks |
|---|---|---|---|---|---|---|---|
| BM1 | 1.425 | 42.350 | Benchmark, RL given | ||||
| A | 1.870 | 0.445 | 41.905 | ||||
| B | 2.315 | 0.445 | 41.460 | ||||
| CP1 | 0.965 | 2.740 | 0.425 | 41.035 | Change point | ||
| C | 1.530 | 0.565 | 40.470 | ||||
| D | 2.085 | 0.555 | 39.915 | Lowest point | |||
| CP2 | 2.880 | 1.210 | 0.875 | 40.790 | Change point | ||
| E | 1.645 | 1.235 | 42.025 | ||||
| BM1 | 1.315 | 0.330 | 42.355 | Closing on BM1 | |||
| Sums | 5.270 | 5.265 | 2.440 | 2.435 |
Follow CP1 through. From set-up 1, the reading before it is the intermediate sight on B (2.315) and the foresight on CP1 is 2.740. 2.315 − 2.740 = −0.425, a fall, so CP1 is 41.460 − 0.425 = 41.035. The level moves and the backsight on CP1 reads 0.965. The next comparison is 0.965 − 1.530 = −0.565, a fall to C. The 2.740 is never compared with the 0.965, because they were read from different heights of instrument.
The three-way arithmetic check
ΣBS − ΣFS = 5.270 − 5.265 = 0.005ΣRise − ΣFall = 2.440 − 2.435 = 0.005Last RL − First RL = 42.355 − 42.350 = 0.005
All three agree, so the arithmetic is right. That is all the check proves. It says nothing about whether the staff was read correctly. The 5 mm gap between the closing RL (42.355) and the known RL of BM1 (42.350) is a field error, called the misclosure, and it is dealt with further down.
The height of collimation method on the same data
Height of collimation (HoC), also called height of instrument, works out the height of the line of sight once per set-up: HI = RL of the backsight point + BS. Every point read from that set-up is then RL = HI − reading.
| Point | BS | IS | FS | HI (m) | RL (m) |
|---|---|---|---|---|---|
| BM1 | 1.425 | 43.775 | 42.350 | ||
| A | 1.870 | 41.905 | |||
| B | 2.315 | 41.460 | |||
| CP1 | 0.965 | 2.740 | 42.000 | 41.035 | |
| C | 1.530 | 40.470 | |||
| D | 2.085 | 39.915 | |||
| CP2 | 2.880 | 1.210 | 43.670 | 40.790 | |
| E | 1.645 | 42.025 | |||
| BM1 | 1.315 | 42.355 |
The RLs match the rise and fall booking exactly, as they must. The standard HoC check is ΣBS − ΣFS = Last RL − First RL, here 5.270 − 5.265 = 0.005 = 42.355 − 42.350.
Why rise and fall checks intermediate sights and HoC does not
In HoC, each intermediate RL is a one-off subtraction from the HI. Nothing later in the book uses it. Write C down as 40.570 instead of 40.470 and the HoC check still balances, because it only looks at the backsights, the foresights and the first and last RLs. The wrong level goes onto the drawing.
In rise and fall, every RL is built from the one before it. Make the same slip, say by booking the fall to C as 0.465, and every RL after C comes out 0.100 too high, including the closing BM1 at 42.455. Now ΣRise − ΣFall = 0.105 while ΣBS − ΣFS = 0.005, and the check fails on the spot.
A longer HoC check does cover intermediate sights: the sum of all RLs after the first equals each HI multiplied by the number of points reduced from it, minus ΣIS and ΣFS. Here, (43.775 × 3) + (42.000 × 3) + (43.670 × 2) − 9.445 − 5.265 = 329.955, matching the sum of the eight RLs after BM1. It works but is clumsy by hand. Neither method catches a staff misread in the first place: the numbers are then wrong but consistent.
| Rise and fall | Height of collimation | |
|---|---|---|
| Calculation per point | Previous reading − current reading, then add to the last RL | HI − reading |
| Arithmetic check covers intermediate sights | Yes | Only with the longer extra check |
| An error in one RL | Carries forward and shows in the check | Stays isolated and passes the basic check |
| Speed with many intermediate sights | Slower | Faster |
| Best suited to | Control runs, carrying benchmarks, levels that must be right | Spot levels and setting out many points from one set-up |
Closing the loop: misclosure and allowable misclosure
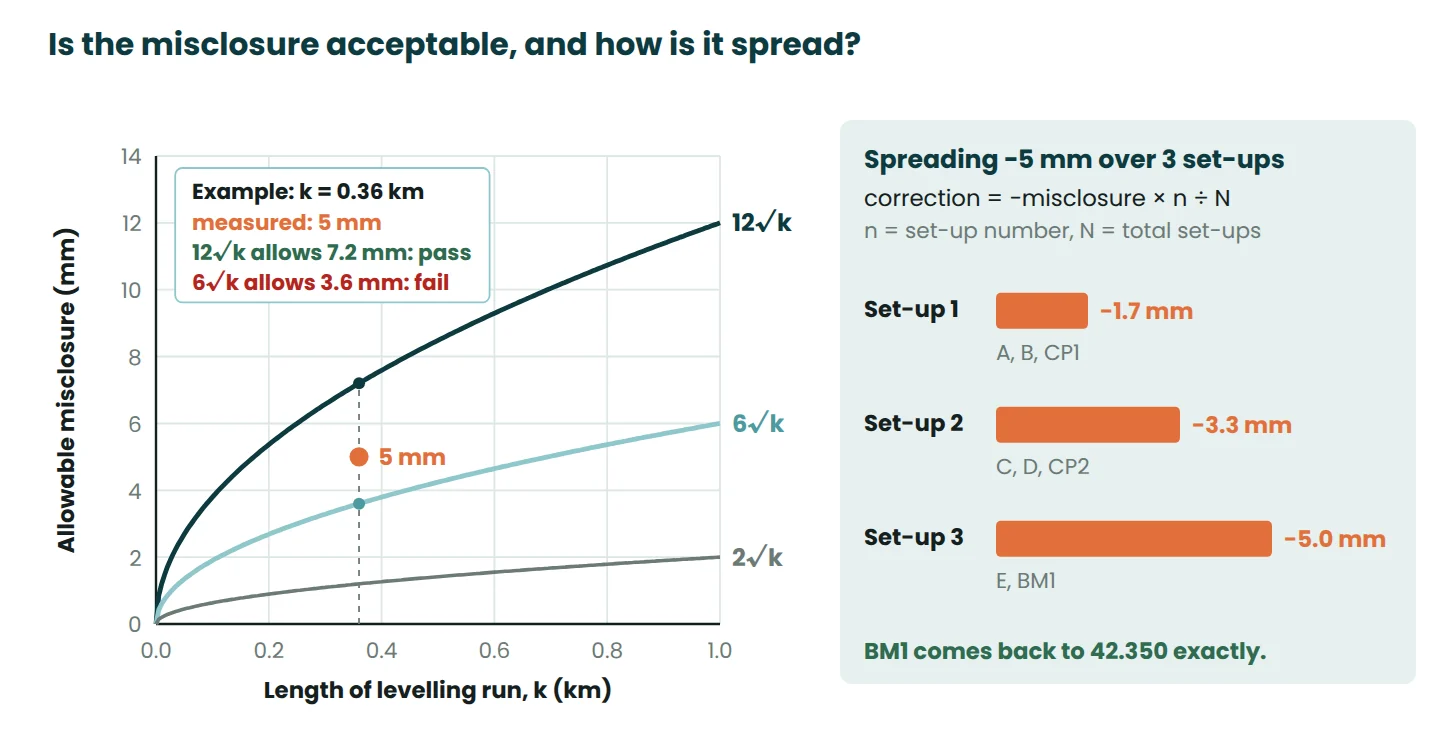
A booking that passes the arithmetic check can still hold field errors. To test the readings themselves, close the run on a known RL: back on the starting benchmark (a loop) or on a second benchmark. The difference between the computed and known RL is the misclosure, here 42.355 − 42.350 = +0.005 m, or 5 mm.
Allowable misclosure is normally set as r = n√k, where r is the limit in millimetres, k is the length of the run in kilometres and n depends on the class of work. The Australian ICSM guideline for control surveys by differential levelling (Special Publication 1, version 2.2) uses n = 2, 6 and 12 for its three levels of quality, and pairs the 12√k level with ordinary optical or digital levels. Western Australia’s Landgate requirements (GSU-03) apply 6√k to individual levelling bays.
For this loop, k = 0.36 km, so 12√0.36 = 7.2 mm and the 5 mm misclosure passes. Under 6√k the limit would be 3.6 mm and the same run would have to be levelled again. Construction specifications often set their own limit, sometimes per set-up rather than per kilometre. Use what your project specifies, and agree it before the survey.
Distributing the misclosure
Once the misclosure is within limits, spread it through the run. The usual site method assumes each set-up adds an equal share of error, so the correction grows by one step per set-up: correction at set-up n = −misclosure × n ÷ N, where N is the number of set-ups. Here the step is −5 ÷ 3 = −1.7 mm, and every point read from a set-up takes that set-up’s correction.
| Point | Set-up | RL before (m) | Correction (mm) | Adjusted RL (m) |
|---|---|---|---|---|
| BM1 | Start | 42.350 | 0 | 42.350 |
| A | 1 | 41.905 | −1.7 | 41.903 |
| B | 1 | 41.460 | −1.7 | 41.458 |
| CP1 | 1 | 41.035 | −1.7 | 41.033 |
| C | 2 | 40.470 | −3.3 | 40.467 |
| D | 2 | 39.915 | −3.3 | 39.912 |
| CP2 | 2 | 40.790 | −3.3 | 40.787 |
| E | 3 | 42.025 | −5.0 | 42.020 |
| BM1 | 3 | 42.355 | −5.0 | 42.350 |
The closing BM1 comes back to exactly 42.350. If you recorded sight lengths, you can distribute in proportion to distance instead; when the set-ups are of similar length the two methods give nearly the same answer. One rule matters more than the method: never adjust a run that fails the allowable misclosure. Find the problem or level it again.
Common mistakes in booking and in the field
Booking mistakes
- Subtracting across a change point. Comparing the foresight 2.740 with the next backsight 0.965 would book a false rise of 1.775. Keep the FS and BS of a change point on one line and restart from the BS.
- Rise and fall swapped. A smaller reading means higher ground. If a point you know is higher shows as a fall, check the subtraction order.
- Leaving the check for the office. Do the sums before you pack up. If the check fails on site you can still re-read the staff.
- Overwriting figures. Strike through a wrong reading with one line and rebook it next to the original. A level book is a record, and a smudged 1.065 that might be 1.665 is worthless.
- Not closing at all. An open run that ends on an unknown point cannot reveal a field error, however neat the book.
Field mistakes
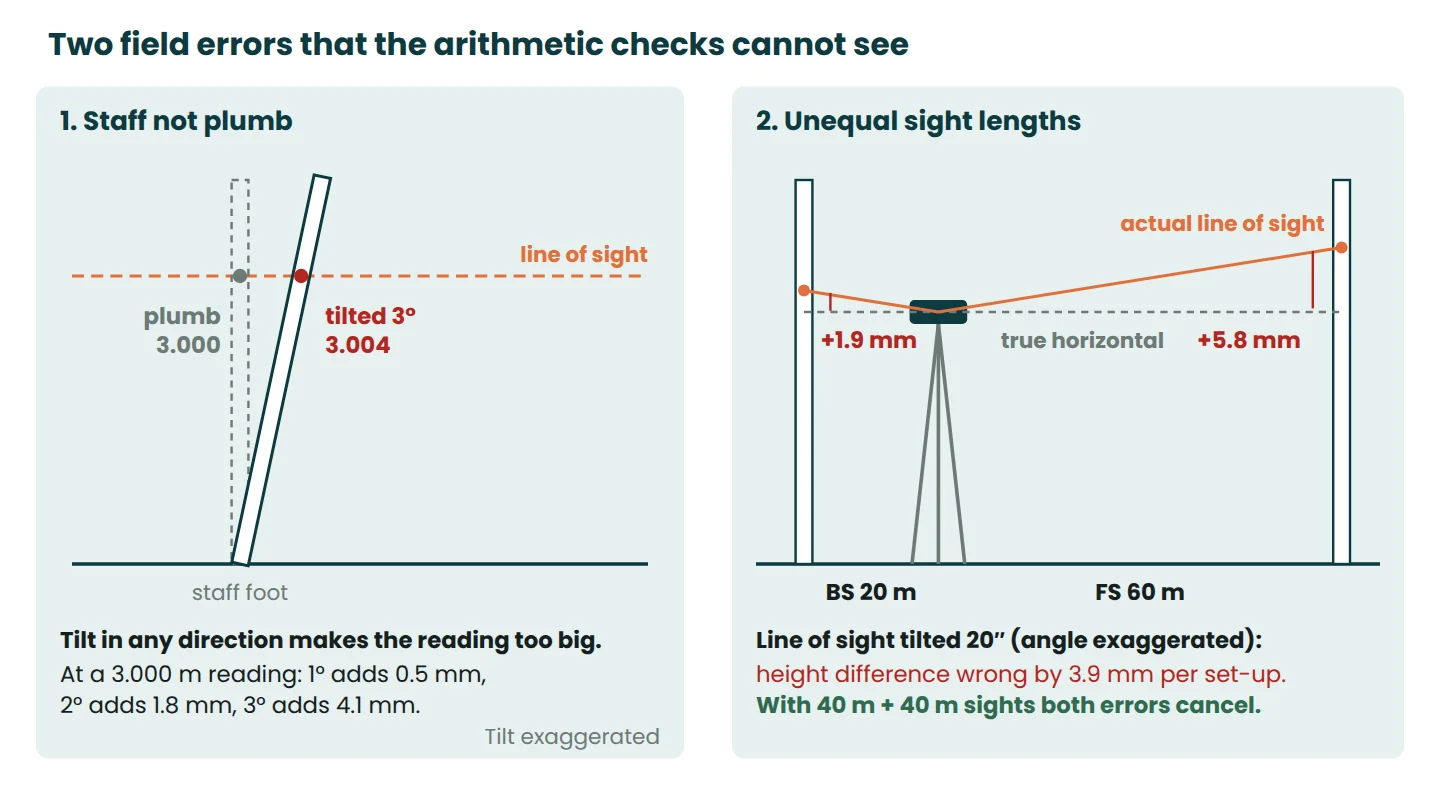
Staff not plumb. A tilted staff always reads too high, whichever way it leans. At a 3.000 m reading, a 1° lean adds 0.5 mm, 2° adds 1.8 mm and 3° adds 4.1 mm (the reading becomes 3.000 ÷ cos θ). Use the staff bubble. With an optical level, have the staff holder rock the staff slowly towards and away from the instrument and book the smallest reading.
Unequal sight lengths. If the line of sight tilts slightly when the instrument is levelled (collimation error), every reading is wrong in proportion to its length. With a 20″ error, a 20 m backsight reads 1.9 mm high and a 60 m foresight 5.8 mm high, so that set-up’s height difference is out by 3.9 mm. Make the sights equal, say 40 m each, and the errors cancel. Pace the distances. Check the level regularly with a two-peg test. Landgate asks for backsight and foresight totals in each bay to agree within 10 m where practical, and for collimation to be corrected where the error exceeds 1.5 mm over 80 m.
Parallax. If the crosshair seems to slide over the staff graduations when you move your eye, the image is not focused on the crosshair plane. Focus the eyepiece on the crosshairs against a plain bright background first, then focus on the staff, and check again by moving your eye slightly.
Sinking tripod or change point. On soft ground the tripod can settle between the backsight and the foresight, and a change point can sink while the level is being moved. Both errors flow into every following RL. Push the tripod legs in firmly, keep off the legs while reading, take the BS and FS of a set-up without long gaps, and put change points on hard surfaces or change plates.
Sights that are too long. Reading errors grow with distance and with heat shimmer near the ground. ICSM caps sights at 80 m for its lowest class and 30 m to 50 m for the higher ones. An extra set-up costs less time than a failed loop.
Using the levels once they are reduced
Adjusted RLs feed straight into the next job. Check grades between points with the slope calculator and turn grid levels into cut and fill in the earthwork calculator. When pegging a new building, the same booking carries levels from the benchmark to the profile boards, as shown in our guide on how to set out a building. To confirm a booking, enter it in the levelling calculator, which reduces the run by rise and fall, runs the three-way check and spreads the misclosure by set-up exactly as above.
Frequently asked questions
Which is better, rise and fall or height of collimation?
Rise and fall is better when the levels must be checked, because its arithmetic check covers every reading. Height of collimation is quicker when you take many intermediate sights from one set-up, such as spot levels across a pad. If you use HoC for speed, run the longer check or re-observe the points that matter.
Why does a smaller staff reading mean higher ground?
Because the reading is the distance down from the horizontal line of sight to the point. Higher ground sits closer to the line of sight, so less of the staff shows below it.
What is the difference between a benchmark and a change point?
A benchmark has a known RL and stays in place for the whole job. A change point is any firm temporary point used to carry the level from one set-up to the next, and its RL is worked out from the run.
What is an acceptable misclosure in levelling?
It depends on the class of work and your project specification. A common form is n√k millimetres with k in kilometres. ICSM uses 12√k for ordinary optical or digital levelling, so a 0.5 km run would be allowed about 8.5 mm.
References
- Intergovernmental Committee on Surveying and Mapping (2020). Guideline for Control Surveys by Differential Levelling, Special Publication 1, Version 2.2.
- Landgate (2025). GSU-03: Landgate Requirements for Geodetic Surveys by Differential Levelling. Western Australian Land Information Authority.
- Merry, C. Basics of Levelling. Lecture notes from the GLOSS training course, University of Cape Town, published by the Permanent Service for Mean Sea Level.
- Mahun, J. Differential Leveling Notes. Open-access surveying text, Elevations chapter C.
This article is general information for learning and planning. Always follow your project specification, the current survey standard and the advice of the responsible engineer or surveyor.

Leave a Reply